This is something home internet users often want to do to better organize and manage devices connected to a router. A connected devices list can initially look like a mess of random device names and MAC addresses, so how can we organize it more by renaming devices into something we can recognize more easily (like Jane’s PC, John’s Laptop, Mike PS4, Sam Tablet etc)?
Whether you can do this varies between different routers, but here is a quick summary of how you can sometimes rename devices on a router:
- Log into your router (192.168.0.1 or 192.168.1.1 in browser)
- Enter the router username/password
- Find Devices/Connected Devices/DHCP Clients/Wireless Clients.
- A list of connected devices should appear.
- Click the Edit or Change Hostname option next to a device
- Rename the device to what you want.
- Not all routers allow you to rename devices.
We’ll cover all these steps in detail further below. We’ll also cover how to find out which device belongs to whom on a home network, as when you first see a connected devices list, it can all be a bit confusing and difficult to see which device is which.
And we’ll cover what to do in the case that your router does NOT allow you to edit or change device names as well – you have to do it on the device itself, which we’ll also offer help with.
Let’s look at the process of changing device names on a router/device step-by-step.
Step #1 – Find Your Router Login Details
If you have direct access to your router, this is easy. There’s usually a sticker on the back that has the router login IP, admin and password. Find them and note them all down; it’ll look something like this:
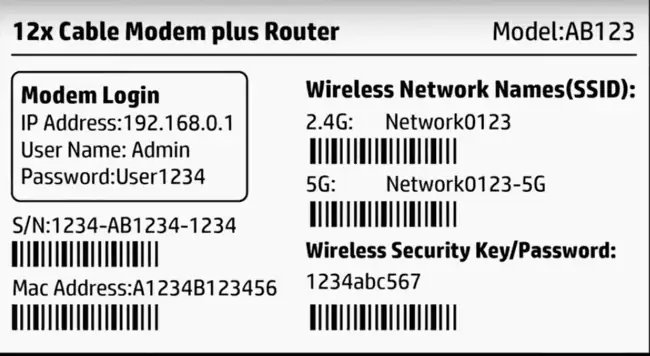
If you don’t have direct access to the router, then you can Google your router make and model if you know it, or perhaps your ISP and router, and it should be possible to find your router login and admin/password, as long as they haven’t been changed from the defaults. If they’ve been changed, then you’ll have to get the details off the person who knows or do a full factory reset of the router to reset all login/password details to default.
In any event, the router login IP is usually 192.168.0.1, 192.168.1.1 or 192.168.1.254 in North America and Europe, though it can vary.
Step #2 – Log Into Your Router
Once you’ve got the login details, you just need to find any device with an internet browser and proceed as follows:
- Log in to your router, using the login IP/admin/password you found in Step #1. Start by typing the login IP into any browser address bar. The router login is often 192.168.0.1, 192.168.1.1 or 192.168.1.254 or may be something different. Check the sticker on the back of your router.
- Type in the admin and password – again will be on the router somewhere or online.
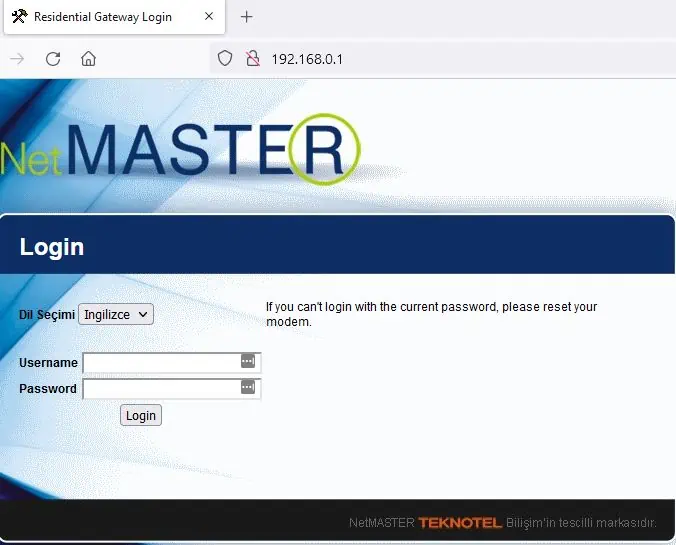
- See here for our help guide if you are struggling to login to the router setting page.
- If someone has changed these then you’ll need to get the details off them or do a full factory reset of your router to reset all logins to default.
See also our router login credentials guide for the default username/password for all major router brands.
Step #3 – Find The Devices Menu
Once you are inside the router, you are looking for a Devices or Connected Devices or Wireless Clients menu, which displays a list of connected devices, with their MAC addresses (unique physical identifiers). Like this:
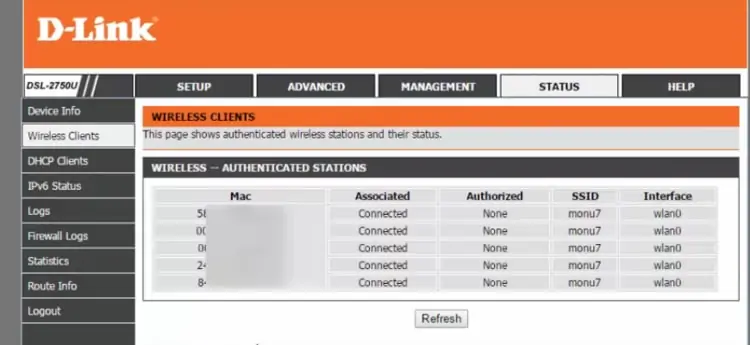
As with most router settings however, different brands and models have different menu structures and will display this setting under different names.
For example, on some routers, connected devices will be displayed under the DHCP Clients List under DHCP Settings, like here on a TP Link router:
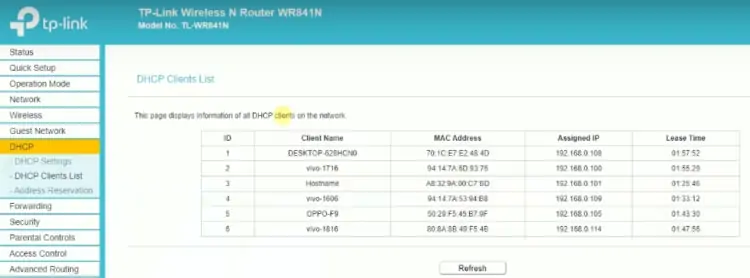
Others might display it under Attached Devices. There are other routers that also display this information at a glance under Wireless Settings, especially if Dual Band is enabled . Sometimes, for example, if you just go to the Dual Band Wireless settings page, it will display, at a glance, how many users are connected to the 2.4 GHz and 5 GHz bands.
Like this:
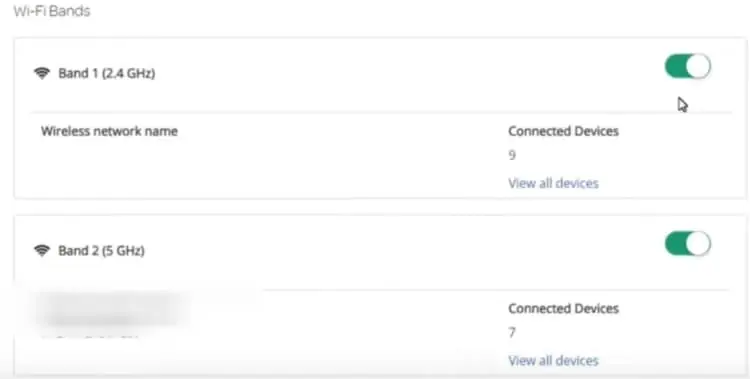
You can then click through to see more information, like the MAC address of the devices.
Sometimes, this information will also be broken down into online and offline devices, telling you which devices are (or are not) actually using the router this very minute.
Step #4 – Change The Device Name (If Possible)
Once you’ve got your list of devices, you are looking for some kind of option to edit or change the name of each, somewhere near each device.
Here are some of the ways this can be displayed:
- Edit
- Change
- Change Hostname
- A Pencil symbol next to each listed device.
- A cog symbol next to each device, which may open up Settings, which may have an option to edit/change the device name.
You are looking for any of these options, somewhere near the list of connected devices, perhaps next to each device.
If possible, you then need to change the device names to something more recognizable (eg. Sergio Laptop, Samantha Tablet etc), and Save changes or click OK to confirm.
It should be mentioned that NOT ALL routers allow you to change the names of connected devices.
I just logged into my own router for example, and it doesn’t allow you to do this. It displays a list of details of connected devices, but doesn’t allow you to change or edit any of these details.
In this case, you’ll have to rename on the device itself. See the last section below for more on this.
Identifying Connected Devices (Which Belongs To Whom)
In some cases it can be that we don’t even know what to make of a connected devices list. It can just appear as a list of anonymous looking device MAC addresses and generic names like “Phone1234” or “Unknown device”, to the point where we don’t even know which device belongs to who.
To parse through this, you might need to find the MAC address of each device on your home network, and match this to the MAC addresses displayed on the Connected Devices list, so you know which device is which.
You can find the MAC address of a device on most devices themselves, somewhere in the menus (often in the Network/Internet/Wi-Fi/Device Info settings).
See this useful guide for finding the MAC address of all major devices; we’ll list some of the more common ones below:
1. Windows 7 – Go to Control Panel.…Network & Sharing/Network & Internet.….Change adapter settings. Right click on the connection (Wi-Fi or ethernet) currently in use, and click Status. Then click Details, and a list of settings, including the MAC Address, should come up to note down.
2. Windows 10 – If on Wi-Fi, click the Wi-Fi symbol in the bottom right, then click Network Settings. On the Settings screen that comes up, click Properties, and a list of settings, including the Physical MAC Address, should come up. If on ethernet, go to Settings…..Network & Internet…..Ethernet. Click on your current connection, then click Properties, and the same list should appear to note down.
3. iPhones/iPad– Go to Settings….General….About. The MAC address is listed further down as the “Wi-Fi Address”
4. Android – Can vary a little between devices, but in general: pull down from the top of the screen, tap the Gear icon and then tap the Settings app to open it. Go to Wireless & Networks and tap Wi-Fi, then tap the menu button and then tap Advanced. The MAC address is displayed at the bottom.
5. macOS – Open the Apple menu, go to System Preferences…..Network. Select your connection, then click Advanced. The MAC address is displayed on the Hardware tab.
6. Games Consoles (PS4/PS5/Xbox One/Xbox X) – Go to Settings…..Network……View Connection Status/Connection Settings.
See the linked article above for finding the MAC for more specialized devices that aren’t listed here.
Once you’ve found the MAC address, just note it down, and you can then match it up to the displayed MAC addresses on the connected devices list on your router. You’ll then know which device is which.
As a side note, if you actually find some devices on your network which shouldn’t be there (eg. neighbors using your Wi-Fi without permission), then see our article on how to kick them off your router for steps on how to get rid of them.
Changing The Device Name On The Device Itself
If your router settings don’t give you the option to change the device name, then your only remaining option is to change the name of the device on the device itself, which again most devices should allow you to do.
Here are links to guide to help change the names on some of the more popular devices (click on the links for more detailed steps):
1. Windows 7 Devices – Click Start, then right click on Computer, then click Properties. Scroll down to the Computer name, domain and work-group settings, then click Change settings. Click Change on the Computer Name tab, and rename the device to what you want.
2. Windows 10 Devices – If on Wi-Fi, click the Wi-Fi symbol in the bottom right, then click Network Settings. On the Settings screen that comes up, click Properties, and a list of settings, including the Physical MAC Address, should come up. If on ethernet, go to Settings…..Network & Internet…..Ethernet. Click on your current connection, then click Properties, and the same list should appear to note down.
3. iPhones/iPad – Go to Settings….General….About….Name. Tap X and enter a new name and tap Done.
4. Android – Can vary between devices but in general: swipe down from the top of the screen, tap the Gear icon and then tap the Settings app to open it. Go to About Phone (or go to System first on some devices), then Device Name and tap it or tap the pencil symbol to edit. Rename the device and Tap OK/Save.
5. macOS – Open the Apple menu, go to System Preferences…..Sharing. If the lock symbol at the bottom left is locked, click it to unlock, and type a new name in the Computer Name field.
6. Games Consoles – For PS4/PS5 consoles, go to Settings…..System……System Information and edit the console name (see here). For Xbox One/Xbox X consoles, go to Settings….System…..Name and edit the name (see here).
If you do this and then refresh the connected devices list on your router, it should then display as the new name you’ve set it to.